Aluminum Jon Repair

bplayer405

Well-known member
Messages
211
Good Post Points
55
Back to reality... Since the hull is now sealed I started welding in the floor framing. Gonna take some time for sure. Still haven't found the right settings to make things go smoothly. 120 amps takes a bit too long to heat up on pulse. Gonna try 140 - 150 amps tomorrow. 20210501_211308.jpg
 

Gary Fowler

Well-known member
Messages
717
Good Post Points
200
The first thing I would have to build is a boat rotator. to hold the boat on its side. No way could I bend over the gunnels or kneel inside to get all that welded. I can almost feel your pain for this project.
 

bplayer405

Well-known member
Messages
211
Good Post Points
55
The first thing I would have to build is a boat rotator. to hold the boat on its side. No way could I bend over the gunnels or kneel inside to get all that welded. I can almost feel your pain for this project.
Now that it's started, I could do that. Thanks for the insight. I could switch back to the foot pedal also and lose the pulse I use with the finger switch. I feel that's part of my contamination issues from not getting hot enough.

A rotator setup would be nice. I could suspend the the boat from the ceiling then pull out the trailer as well. Maybe my half gambrel will lift the transom and use a ceiling lift for the front. I will look into that because I had a call yesterday from an acquaintance that wants me to do a remodel on his boat; deck extension with storage lid/s. Would definitely help. I turn 52 in a couple weeks and I'm in fairly good shape, but I'm all about working smarter not harder when I can.
 

bplayer405

Well-known member
Messages
211
Good Post Points
55
Fillets have been giving me fits. I've been starting too cold and forcing them which gives me nasty, contaminated welds. Trying to add filler too early. They take heat, but appropriate heat. There's 6 fillet welds on either side of the floor joists on each floor rib. I've went from nasty to clean just waiting on the puddle to start good and take filler. Either 5356 or 4043 work fine for me now. Talk about a revelation. I may actually get good at this sometime... lol
 

Gary Fowler

Well-known member
Messages
717
Good Post Points
200
Fillets have been giving me fits. I've been starting too cold and forcing them which gives me nasty, contaminated welds. Trying to add filler too early. They take heat, but appropriate heat. There's 6 fillet welds on either side of the floor joists on each floor rib. I've went from nasty to clean just waiting on the puddle to start good and take filler. Either 5356 or 4043 work fine for me now. Talk about a revelation. I may actually get good at this sometime... lol
Aluminum welding is much faster if you have a remote so you can hammer it to start then back off as it heats up and back way off at the end to keep the crater cracks from forming. You can do it with constant current but it takes a long time to get it hot enough to flow and you really have to watch it to keep from soaking in a bead to the back side or worst case blowing a big hole.
 

bplayer405

Well-known member
Messages
211
Good Post Points
55
Aluminum welding is much faster if you have a remote so you can hammer it to start then back off as it heats up and back way off at the end to keep the crater cracks from forming. You can do it with constant current but it takes a long time to get it hot enough to flow and you really have to watch it to keep from soaking in a bead to the back side or worst case blowing a big hole.
Yeah, that's my issue when I'm inside the boat working, can't use the pedal to control amperage. Just a finger trigger running pulse. It's a balancing act waiting on a puddle to getting things going without too much heat and blowing through and using the filler to help cool the puddle.

The bottom angle on the floor ribs is ⅛" where the 1" square tube is 1/16". I've had to fill a few holes on the tube already. I'm finding it easier to put most of the heat on the thicker angle and wick the bead up upon the tube. Doesn't always work as planned though.
 

bplayer405

Well-known member
Messages
211
Good Post Points
55
Whew... got all the fillet welds done on the floor framing. I think. May still add pieces between (making a grid. May not be needed). Machine settings were pulse at 95 amps, 60% duty, 20 amps low side, 120 freq, 35% balance. Got in real tight to build heat on the thicker material and found that 1/16" 5356 ran the smoothest and quickest.

The next 3 welds may be interesting. Notched angle where the "joists" sit with a flush surface for the decking above (the end by the battery tray). I'll have to be careful with the heat for sure.
View attachment 1547
 
Last edited:

Gary Fowler

Well-known member
Messages
717
Good Post Points
200
Try using a bigger rod (3/32 or even 1/8) to soak up the heat a little better. That way you can run hotter to start and then use the rod to cool the puddle.
 

bplayer405

Well-known member
Messages
211
Good Post Points
55
Using pulse and no pedal limits the heat enough that a thicker filler cools too much. Depends on the joint configuration though, for sure.

Finished the floor framing and put in the foam and laid in the plywood to try it out. There's enough flex under my weight to warrant laying in a grid between the joists. Plan is to add 2 - 6" - 8" pieces of 1" square tubing between the center and outer runs of tubing, welded on the ends to the angle I added to the floor ribs. Was hoping I didn't need to do this. A bit more work.20210505_191501.jpg20210505_203513.jpg20210505_203731.jpg
 

bplayer405

Well-known member
Messages
211
Good Post Points
55
This was an easy addition and it really made the plywood floor quite solid. 20210506_154340.jpg
 

bplayer405

Well-known member
Messages
211
Good Post Points
55
Made another bracket for a starting battery. Not the best location, but saves space and works.20210508_123649.jpg20210508_124032.jpg20210508_125406.jpg
 

bplayer405

Well-known member
Messages
211
Good Post Points
55
Had some holes to fill either side of the deck extension. Used my home-made brake and fabricated some panels out of the piece I cut from the front deck.20210508_141514.jpg20210508_155940.jpg20210509_140003.jpg20210509_145251.jpg

A few rivets and these will be done
 

bplayer405

Well-known member
Messages
211
Good Post Points
55
May be a lot to go through on a used jon boat and it would cost quite a bit to have someone else do the work. Glad it's mine. It will be my billboard, both bad and good, of what I can do on a jon boat. I know this started out with trying to repair a crack on my old jon boat's transom and turned into a project build. My main interest was learning how to weld aluminum and do the repairs and modifying on aluminum boats. I do apologize if this thread has run its course or too off topic. If it is let me know.

I now have 3 guys wanting work done on their boats. Another week or so and this one will be good enough to fish out of (my goal for now). All I'm missing is my front light setup to see where I'm going at night. My front deck is close to 6" below the top rail, so I'm making an elevated deck on the bow. The light will be mounted off to the port side so I can see well. 20210510_183046.jpg
 

Gary Fowler

Well-known member
Messages
717
Good Post Points
200
How about a console on the right side to mount steering and other controls? Then a couple of pedestal seats. Then it would be like a BassTracker boat .
 

Gary Fowler

Well-known member
Messages
717
Good Post Points
200
Where I grew up there was an aluminum boat factory. They used the cheapest labor they could and welding them was the lowest quality welders around. They would train helpers as welders and $5 per hour was top pay. What I am getting at is that welding on thin aluminum is not rocket science and doesnt take a super welder to do it.
Mostly it just takes someone with the right equipment and the ability to just jump in and start welding on them. With some patience and skill, the welds get better and better. Welding on old boats is much more difficult that welding new, clean material. I do commend you on this project that you overtook. Welding those rivets was likely the hardest you will ever find to weld due to all the contamination that you cant remove, but you did it with mostly good results.

What is next, a custom boat fabrication business? BP Boats Inc. Sounds good to me.
 

bplayer405

Well-known member
Messages
211
Good Post Points
55
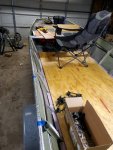
A lot of boats are setup that way and I could convert mine like that. I prefer a tiller setup with a wide open floor plan that gives me plenty of room to move around and adjust to where I'm fishing. I mostly fish for catfish which is a slower paced process. I prefer to be low in the boat for better stability also. It's why I prefer to just use camping chairs on the lower deck. They're very comfortable and adjust to wherever I want them. The front deck will probably get a fixed mount chair location for bass fishing. The pic shows me marking rod holder locations with blue tape (the chair is huge, comfy and reclining). 22665.jpg
 

bplayer405

Well-known member
Messages
211
Good Post Points
55
The rivets definitely were a learning process. They were really better and easier to replace than weld shut. As far as what's next? I want to do repairs and modifications on aluminum boats as a side business. Storage compartments, live wells, front and rear decks, lighting covers and racks, switch and control panels, etc...
 

bplayer405

Well-known member
Messages
211
Good Post Points
55
Tacked up the front platform using tig then switched things out to run some welds with my spool gun. Way less problems with those fillets with mig, once the settings are right...20210513_152933.jpg
 
Top