Welding a wrought iron railing

MC

Administrator
Staff member
Messages
151
Good Post Points
59
Location
San Diego
My first welding project will be one that goes front and center in our entry way... a wrought iron (actually molded steel) railing and baulesters.

After a couple of orders from house of forgings and a trip to king architectural metals here in southern California I'm ready to get started and take this on over the weekend.

My railing sections are 2" molded steel and I need to weld two pieces together for a 15 foot run, then a 35 degree turn and a four foot section. Of course there's also the 32 baulesters and a steel volute.

My plan is to mig weld everything together and clean all the metal surfaces well with a grinding wheel before welding.

I'll let you know how much I mess it up.
 

flyerdan

Active member
Messages
27
Good Post Points
12
I've done lots of OI stuff at the fence company, quite familiar with King and have one of their catalogs right here. You shouldn't have to clean the metal first, any scale will burn through without issue and if it's getting powder coated they will sand blast it first. What you will want to do is use plenty of anti-spatter so you won't spend twice as long chipping berries off with a small chisel that you did on welding. If you can get the concentrate and mix it in your own spray bottle it's a lot cheaper than the tailor-made cans at the lws.
For your picket runs, start in the middle and work your way out, and cut some spacers so you don't have to measure each one and they're all uniformly spaced.
 

MC

Administrator
Staff member
Messages
151
Good Post Points
59
Location
San Diego
Well i started welding yesterday. I have read a little about welders and generally felt mig seemed like a reasonably easy way to get started. I was going to rent a welder for the weekend but at $60 a day for a Lincoln mig, I found myself lured to the world's favorite project tool shop for a $99 Flux core wire feed 120v unit at Harbor Freight. I had low expectations and an assumption that it is just for this project and like with most cheap tools, they actually work against you if you don't know what you're doing.

On that note, my biggest mistake after setting everything up was that I only removed one side of protective film from my auto darkening helmet, so everything was blurry. Combine that with the fact that I was welding outdoors in the bright sun, i really couldn't see anything at all at first. Once I removed the second lens film and could see clearly, I was able to start to make a little more progress.

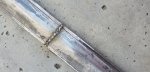
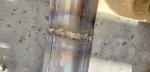
My welds are not pretty but they are pretty strong, at least for what they need to withstand (interior hand rail).

Now for the fabrication plans. I have a 13 step staircase that runs at a 35 degree angle (calculated with good old fashion math and low and behold the angle was correct). On the first step, 6th step, and top landing, I have 7/8 solid steel newel posts that I will weld to cast iron collars found at Lowes, typically used for 1" round pipe. Then those will get screwed into the stair treads and through the treads to the plywood treads, with lag bolts.

The hand rail is about 15' long so I had to weld two 8' sections together, and I'm also putting a volute on the end where the stairs begin.

At the landing, I'll cut the railing at a 35 degree angle where it meets the top landing newell post, and then there's a straight section about 42". I'll open up the wall and put a 2x4 stud exactly where my railing will meet the wall. I'll weld an anchor tab to the railing and fasten the tab to the wall with a lag bolt.

For the baulesters, I'm using a mix of straight, single knuckle, and s curves, all made of 1/2" steel. These will be tack welded to the hand rail and then set in 5/8 holes drilled with a forstner bit in the treads, and secured with epoxy.

My biggest challenges are first and foremost not having a huge shop to fabricate a 19 foot railing in, so keeping everything perfectly straight is probably not going to happen. But just as no wall in my house is perfectly plumb, I'm not going to lose any sleep over fractions of an inch as long as it looks good and I'm happy with the result.

So in terms of order of work, I am first welding the hand rail together and then I'll temporarily place the newel posts on the steps to test fit the railing. I will tack weld the railing to the newel posts while it's in place so I know that the thing will actually fit! Then I'll remove it, finish the welds of the posts, and bring it back inside. Then I'll repeat the process for the baulesters by tack welding each to the hand rail while they are lined up and in the holes drilled on the stair treads. I know that I just don't have the shop setup to do this any other way and avoid those baulesters being all over the place. Once they are welded I would rather not have to bend the welds to fit things.

After everything is tack welded I'll remove the entire railing (probably about 220lbs and we'll have three guys to move it), I'll finish any welding and do all the grinding outdoors. Then I'll coat the entire railing in primer filler and follow with flat black paint. If I can find a matte clear coat I'll add that as a final step. I will definitely set up a makeshift paint booth since we have lots of sawdust on my back patio and trees, flowers etc.

So far I'm about $1,000 in on materials (because I bought some things I didn't wind up using), $99 for the welder, and $150 in supplies and PPE. I did get a quote from an iron railing contractor and he bid $7,000 for the railing. I figure I'll be at $1,500 and a few days of time when I'm finished.

Here's a picture of one of my first welds.
 

Attachments

  • 20200904_151936.jpg
    20200904_151936.jpg
    652 KB · Views: 75

flyerdan

Active member
Messages
27
Good Post Points
12
That's awful steep, I think we were somewhere around $150 a lineal foot ballpark for OI railings, powder coated and installed.
The HF fluxcores have a somewhat undeserved reputation; most faults are trying to use them on an extension cord, and using wire from the same store. Get Hobart or Lincoln wire, and if you need a longer cord, make up a heavy one just long enough to do most jobs. They are fairly persnickety on voltage drops, and you might hit the duty cycle limits when you're ready to finish weld it.
It looks like your wire speed might be a bit too high, try turning it down a bit to get more wetout at the edges, plus there will be less cleanup with the flatter welds. If you don't already have it, the air angle grinder with a 2" roloc pad is fantastic for cleaning up OI stuff, it gets into areas where a regular grinder can't get close to. Plus with the Scotchbrite finishing discs you can blend it to the point you can't tell where the weld is.
 

MC

Administrator
Staff member
Messages
151
Good Post Points
59
Location
San Diego
Today I re-did everything I did yesterday. :ROFLMAO:

I started the day by grinding and found that my welds had cracks in the middle where the pieces met. So basically I had no room between the pieces and the welds were on the surface only. I guess that could be okay if I didn't grind everything down to the surface again. Once the welds were ground down I was able to break off one weld with my bare hands and another i decided to re-do to get it cleaner even though I couldn't break it.

Once I re-did the welds I put about a 1/8" gap between pieces and filled with the weld. Once ground down I saw no cracks and it isn't bending.

I also discovered that for this handrail the 4.5" grinder is a bit bulky and I can only get things about 90% smooth. Not a big deal since the balusters are hammered steel look so that's actually the look I'm going for. Lots of margin for error. But I'm using a 120 grit flap and with a new pad I can make a decent edge.

So now I'm ready to cut and weld my final run of hand railing and attach the handrail. Maybe tomorrow.

Here's the last weld I did today. Same settings as yesterday so I have plenty of room to tweak things.
 

Attachments

  • 20200905_144854.jpg
    20200905_144854.jpg
    266.6 KB · Views: 54

CA_Bgrwldr

Well-known member
Messages
166
Good Post Points
50
Location
Grass Valley, CA
Welder
Hobarts
With your bead, it helps to keep a rhythm count in your head, as you move the the tip back and forth, and make sure to drag not push the bead.
If you didn't buy anti-spatter spray, cooking spray, like PAM, will do the same thing.

To help with glare while welding outside, you need something to block the light from behind you. You can buy one, or make your own.
vvcap 2020-09-05-23-05-04.jpg

I just use a piece from an old t-shirt that I attach using velcro.
 
  • Good Post
Reactions: MC

MC

Administrator
Staff member
Messages
151
Good Post Points
59
Location
San Diego
That's awful steep, I think we were somewhere around $150 a lineal foot ballpark for OI railings, powder coated and installed.

Well I'm in San Diego where currently almost any "home improvement" is billed at $100/hr per person. It's way out of control but supply and demand has pushed prices up. It's motivated me to do almost everything myself and only bring in a professional when I mess something up.
 

Gary Fowler

Well-known member
Messages
715
Good Post Points
199
Today I re-did everything I did yesterday. :ROFLMAO:

I started the day by grinding and found that my welds had cracks in the middle where the pieces met. So basically I had no room between the pieces and the welds were on the surface only. I guess that could be okay if I didn't grind everything down to the surface again. Once the welds were ground down I was able to break off one weld with my bare hands and another i decided to re-do to get it cleaner even though I couldn't break it.

Once I re-did the welds I put about a 1/8" gap between pieces and filled with the weld. Once ground down I saw no cracks and it isn't bending.

I also discovered that for this handrail the 4.5" grinder is a bit bulky and I can only get things about 90% smooth. Not a big deal since the balusters are hammered steel look so that's actually the look I'm going for. Lots of margin for error. But I'm using a 120 grit flap and with a new pad I can make a decent edge.

So now I'm ready to cut and weld my final run of hand railing and attach the handrail. Maybe tomorrow.

Here's the last weld I did today. Same settings as yesterday so I have plenty of room to tweak things.
That looks like you are welding with too low amps. Boost up your wire feed by 20 IPM and amps(put the machine on high setting). Weld should be smooth and well penetrated. I have both a 170 amp Titanium MIG by HF and the little 125 amp 110 v Titanium. The small Titanium welds so good that I like to use it more so than the larger machine. I makes really smooth welds too and in all positions. I welded up my brother in laws bush hog and did vertical, horizontal and even overhead welds and all were easy and smooth. The 110 volt Titanium flux machine is about twice the price of the chicago electric 90 amp that you have but it is well worth the extra cost. I does only do FCAW and the Titanium 170 does MIG and FCAW but is more that twice the price,
 

MC

Administrator
Staff member
Messages
151
Good Post Points
59
Location
San Diego
@Gary Fowler The unit i have has low and high settings but I was using an extension cord out of necessity. I only have a couple 20amp circuits in my house right now so getting to the back yard with 20amp requires an extension cord. I will I the speed and use some cooking spray next time.
 

California

Well-known member
Messages
378
Good Post Points
144
Location
Sonoma County
The unit I have has low and high settings ... I only have a couple 20amp circuits ...
I started flux welding with a previous HF version of what you have and never was able to do nicer work than what you have there. That welder outputs AC, which unavoidably splatters like crazy. With only two heat settings you never have the right heat.

I recommend take it back and get the Titanium inverter 110 volt flux welder for some $80 more. It will be night and day better, not the frustration-maker that an AC output welder is. The inverter welder is lighter because it uses modern electronics in place of a massive transformer, and it has slightly more output available due to greater efficiency. Continuous voltage control instead of just Hi/Lo is a big step up in usability. Your 20 amp circuit should be fine for this project, it isn't a limitation until you get into welding heavier material.

I eventually gave up on my 110v HF AC welder and got a used Century unit with similar specs but DC and continuous voltage adjustment. That made a big improvement in ease of use and quality of results.


Also - you mentioned your first welds could be broken. It is essential to weld over clean metal, and flux welding leaves a residue. You need to use an angle grinder with abrasive or agressive wire brush wheel on it, to clean an existing weld before going back over it.

Good luck with this project!
 
  • Good Post
Reactions: MC

MC

Administrator
Staff member
Messages
151
Good Post Points
59
Location
San Diego
@California I will take your advice. I was hoping that with some time I could get good with this unit but if you were never able to get the spatter down, I might as well cut my losses and trade it now. I like the looks of the easy titanium unit, will check it out tomorrow.
 

welding seabee

Well-known member
Messages
63
Good Post Points
59
My first welding project will be one that goes front and center in our entry way... a wrought iron (actually molded steel) railing and baulesters.

After a couple of orders from house of forgings and a trip to king architectural metals here in southern California I'm ready to get started and take this on over the weekend.

My railing sections are 2" molded steel and I need to weld two pieces together for a 15 foot run, then a 35 degree turn and a four foot section. Of course there's also the 32 baulesters and a steel volute.

My plan is to mig weld everything together and clean all the metal surfaces well with a grinding wheel before welding.

I'll let you know how much I mess it up.

Wrought iron is a little different. It has a high carbon content (less than cast iron). Hobart makes a good MIG wire. Practice on scrap a lot first till you get the technique down. I have always welded WI by torch brazing, leaves the little yellow line. Surprised you are using a small MIG machine as a newbie starter. Most of us recommend starting out with a 230 VAC 200A buzzbox and practice on scrap to get started out. Ron
 

California

Well-known member
Messages
378
Good Post Points
144
Location
Sonoma County
... practice on scrap to get started out.
Good advice! MC surely you have some scrap around that you can grind clean and practice on. Then practice on any cutoff scrap from that railing material.

Thingy (?) long ago posted about learning welding: "First you get good at grinding [to take down imperfections for a second pass] then you get good at welding."
 

MC

Administrator
Staff member
Messages
151
Good Post Points
59
Location
San Diego
I took back the cheapo AC flux unit and got the titanium flux 125 today. I didn't test it out yet.

So technically the handrail is steel and the baulesters are wrought iron.

Indeed I've already been practicing on scrap railing. It's at the point where I can grind the visible parts down to a satisfactory blend. I'm hoping the DC unit will make some cleaner welds but overall I'm getting the hang of it. I think.
 

MC

Administrator
Staff member
Messages
151
Good Post Points
59
Location
San Diego
:love:The DC unit is night and day. Much more control and the portability came in handy today when I had to weld the baulesters indoors. Tomorrow the three man job of removing this entire railing and then I'll finish all the welds, prime it, and paint, then reinstall and epoxy the baulesters into the stair treads. No turning back after that. I'm thinking this will actually get finished soon.
 

Attachments

  • 20200908_175041.jpg
    20200908_175041.jpg
    188.7 KB · Views: 46

MC

Administrator
Staff member
Messages
151
Good Post Points
59
Location
San Diego
Wider angle
 

Attachments

  • 20200908_175735.jpg
    20200908_175735.jpg
    165.4 KB · Views: 27

Aczlan

Active member
Messages
40
Good Post Points
9
Now we see where all that TBN advertising money is going :D
Not sure what you've done so far, but the welders who have been putting in refrigeration piping at work have been using cardboard between what they're welding and the wall for any splatter to land on. Makes for a whole lot less clean up that way.

Aaron Z
 

MC

Administrator
Staff member
Messages
151
Good Post Points
59
Location
San Diego
Now we see where all that TBN advertising money is going :D
Not sure what you've done so far, but the welders who have been putting in refrigeration piping at work have been using cardboard between what they're welding and the wall for any splatter to land on. Makes for a whole lot less clean up that way.

Aaron Z

I used a welding blanket for the spatter inside... only a couple embers got on the stair treads. The rest of the welding and grinding will be done outside. But yeah I'm a firm believer in ramboard for any reno project.
 

Gary Fowler

Well-known member
Messages
715
Good Post Points
199
:love:The DC unit is night and day. Much more control and the portability came in handy today when I had to weld the baulesters indoors. Tomorrow the three man job of removing this entire railing and then I'll finish all the welds, prime it, and paint, then reinstall and epoxy the baulesters into the stair treads. No turning back after that. I'm thinking this will actually get finished soon.
I have both the Titanium 125 and the Titanium 170. For flux core welding, I like the 125 better, it feeds much smoother than the 170. For thicker than 1/8" I set the dials on G and 7 on the wire feed. It penetrates well and makes a smooth weld with no undercut and a nice looking surface.
My friend has a Hobart 140 and has done a lot of welding with my 125 and he says it welds much better than his Hobart and it is less that half the cost . The Hobart is over $400 while everyday price of the Titanium is $199 at HF. I got mine on sale for $159. I just happened to go to HF and saw it for that price and couldnt resist. A few months later I wanted to get a machine that could do MIG hard wire so I got the MIG 170 but I still hook up to the 125 most of the time. I do like the longer MIG gun on the 170, the 125 is only about 6 feet long but the machine is so light that you could use the straps to carry it around. I have used the 125 with 100 feet of extension cord on a 20 amp circuit and it welded fine. I was a little concerned about it, but I had a 12/3 cord so it was a pretty good current carrier.
 
Last edited:

MC

Administrator
Staff member
Messages
151
Good Post Points
59
Location
San Diego
Here's a weld I did with the DC titanium flux 125 on voltage I and speed 6, which seems to be pretty good. This is with a quick wire brush by hand after the weld. I'm pretty sure this weld would be impossible on the standard AC flux 125. I can definitely feel much better control and penetration with the titanium 125. I also like the light weight.

Today was a day of reckoning on the railing. My plan of removing the railing and then painting is not going to work. I removed it and a bunch of the tack welds failed and we lost some baulesters during transport. Rather than try to line everything up and deal with fitting 28 baulesters on a 200lb railing, I'm going to just fabricate and paint everything inside. It will be messier if I need to do a lot of grinding but I think it's the only way with my design incorporating the baulesters directly into the stair treads. If the whole railing unit had a bottom rail then it would be a no brainer to fabricate separately and then install. That bottom rail would also have provided more integrity.
 

Attachments

  • 20200909_143504.jpg
    20200909_143504.jpg
    675.5 KB · Views: 38
Top